Composer – Setp 1 create a new custom type

Composer – Setp 1 create a new custom type


  1. Create a new project
    File –> new –> project
    select Documentum Project and enter a new project name
  2. Create a new custom type
    expand the Documentum Navigator on the left hand side
    file–>new–>other–>select Type and click next
    enter a new Artifact name and click Finish.
    In the main composer window the General tab displays.
    1st we need a supertype object. Select dm_document as supertype, because we need the document properties.
    2nd on the attributes tab creates a new attribute
    In the Structure section, specify the following values for the fields:

    1. Data Type = STRING
    2. Length = 20

    Expand the status attribute node and click on Value mapping. The Conditional Assistance and Value Mapping Table sections appear on the right side.
  3. In the Conditional Assistance section, click on New (screenshot).

    It is possible to enter a fixed value list or enter a DQL query. Select the checkbox for List is complete. This prevents any custom input being entered for the status attribute.

    Click OK to finish this action.
    Save the project and check the Problems and Error log tab. No problems or errors should be displayed.

  4. Display tab:
    create a new display configuration (screenshot)In the Configuration  Label field, type an unique and comprehensible name. This will be the name of  the tab as displayed in Webtop. Select the checkbox Custom attributes only and add all of your custom attributes.
    Click OK to finish this action
    In the Application Interface Display section, typean unique and comprehensible name for the Type Label field. This text  is displayed in the drop down menu when selecting a type for a new  document in Webtop. Save the project and check the Problems and Error log tab. No problems or errors should be displayed.

Documentum lifecycle basics

Documentum lifecycle basics


Lifecycle performers

+ Session User
+ Superuser
+ Lifecycle User
+ named User
Minimum permission:
Permission: wirte
Extended permissions: change state


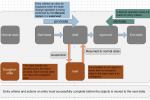
This figure shows the entry criteriea and the possible lifecycle state actions
lifecycle state in a example environment
© www.crazyapple.com


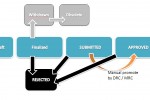
This figure displays one lifecycle from draft to archived state. The states “inreview” and “approved” have a workflow. If the workflow is finished successfully the lifecycle state will be promoted.

Document lifecycle with workflows
© www.crazyapple.com

eCTD file lifecycle

eCTD file lifecycle
lifecycle sequence
document state
Attribute value Meaning Attribute previous file
new The file has no relationship with files submitted previously.
append There is an existing file in a previous submission to which this new file should be associated current and appended
replace The existing file will be replaced by a new file replaced
delete File in the specific folder is not longer relevant. The file is deleted in the current submission but not in the pervious version No longer relevant to the review

eCTD Module 5

eCTD Module 5

Module 5 Clinical Study Reports

The name of the folder for module 5 should be m5.

In cases where the application includes multiple therapeutic indications, the reports should be organized in a separate Section m535 for each indication. In such cases, if a clinical efficacy study is relevant to only one of the indications included in the application, it should be included in the appropriate section in m5 (eg m5\53-clin-stud-rep\535-rep-effic-safety-stud\anxiety\5351-stud-rep-contr). If a clinical efficacy study is relevant to multiple indications, the study report should be included in the most appropriate subsection of m535 and referenced as necessary in the equivalent section under the different indication.

In Module 2, a separate “Summary of Clinical Efficacy” module should be submitted for each indication, although closely related indications can be within a single document.